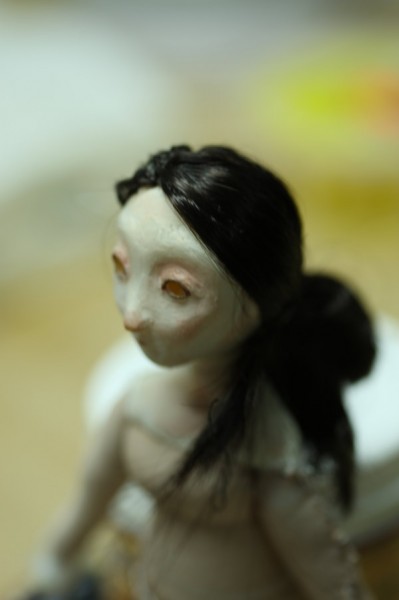
Instal? Hair? Well, I don’t know how else to describe this process. I did this with both practicality and aesthetics in mind, as usual. So it’s about 1/10 rooted strands of hair, and 9/10 glued on. Rooted where you could see the roots, and glued everywhere else.
- I used these nylon hair extensions made by Easihair. Nylon works well because it’s heat-resistant, which means you can iron it and style it with boiling water. (Ouch, poor puppet!) Real human hair extensions would also work, but of course they’re much more expensive, and somewhat gross, in my opinion. So to work with these extensions, I had to take out the elastic that the hair is stitched to, splice the lengths of hair apart (they came sewed into 2 layers of hair, one shorter than the other), and iron each length of hair (on the lowest heat setting!) so that it’s straight and easier to work with.
- Next I painted a “cap” on the puppet’s head where the hair would go, to fill in the scalp with the colour of the hair. I mixed about 2/3 acrylic paint with 1/3 liquid latex so that it’ll be stretchy, and won’t peel away from the scalp.
- Here’s what the length of hair looks like once it’s peeled away from the elastic and its other half…
- I hold the length of hair up to the base of the scalp, and mark the length I’ll need for the base of the scalp. I stick the trimmed piece on with liquid latex, and work my way up the scalp, one layer at a time… letting the latex cure in between.
- Here’s the first layer of hair, stuck in at the base of the scalp.
- Then I add layers about 1 cm apart, wrapping in a horizontal semicircle around the head, to fill in the painted area. There are about 3-4 semicircular layers on this puppet.
- Once I get to the top, above where the part would go, I divide the head into 2 halves, adding smaller strips of hair on either side of the part. I.e. now the strips aren’t semicircles around the head, but rather 2 lines parallel to the part. I build these layer by layer until the 2 strips are about 5 mm apart, surrounding where I want the part to go. So for Liberdade, the part is on one side, so there’s one side that has more strips of hair glued in.
- Now comes the rooting part. First I made a hair rooting tool out of a medium sized needle. Using a Dremel tool, I file off the tip of the needle’s eye, making it open at one end, so that it forms a Y shape.
- I carefully cut apart the strips of hair into strands using an Exacto knife. Thankfully the way these hair extensions are made, the hair is already in perfectly sized strands, looped at the sewn end. I carefully insert the loop of hair onto the Y needle tool.
- Then I jab the hair into the head, strand by strand. This is pretty hard to do… both because it’s kind of gruesome repeatedly jabbing hair into a human-like head… but it’s also a delicate task. I carefully hold the needle in place, with the eye side pointing towards the head, holding the strand of hair, and use pliers to force it into the scalp. It takes quite a bit of force, which is why I learned to use plumber’s epoxy to reinforce the puppets’ head armatures. Otherwise the head will lose its shape here.
- The rooted hair will stick straight up. As mentioned above, the best way to make nylon hair take on a specific shape is to use heat — in this case, I just pour boiling water over the head (!) and smooth it down into place. At the end, I do some paint touch-ups, making sure any latex-glue areas are painted over with the hair colour, to mask any strange gobs.
Here she is, with newly rooted and glued hair. Later she gets a haircut and a special stylin’ ‘do!


Of course nylon hair extentions! Why didn’t I think of that…what a great post, illustrated too like a really good how-to book. Thanks so much!
Hey, glad to help! 🙂 There wasn’t too much information on puppet hair-making out there, that I could find… I was surprised! So this technique is 1/2 from a propmaking book I have, and 1/2 from a website about re-rooting doll hair… which is a pretty useful site —
http://www.dollyhair.com/reroottutorial.htm
They do sell nylon hair on the site (some wild colours!), but I like the hair extensions because they’re already sewn into strips, making the gluing process much easier to handle.
Thanks again…I couldn’t find anything on hair thats why I went with a si-fi story (no hair in the future), but on my next project I might attempt it, it looks really cool!
Simply sensational tutorial, Stephanie!
She’s looking gorgeous.
I’m using the same technique roughly, only with wool yarns as my puppets are scaled so large, hair would be too fine.
Exciting stuff!
Thanks Melvyn, yeah, it’s not as hard to do as you’d think, esp. when you glue on most of the hair. The rooting takes a bit of practice but it’s the only way to get a realistic-looking part that I could find… and it really doesn’t take long to do.
Thanks Shelley! 🙂 Ooh, I’m so curious to see your puppets!