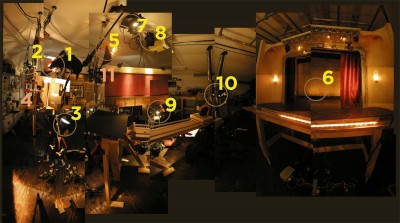
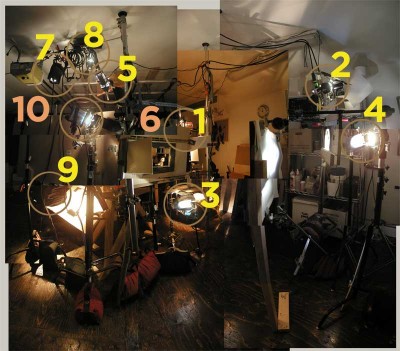
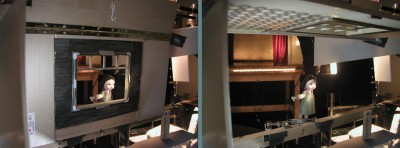
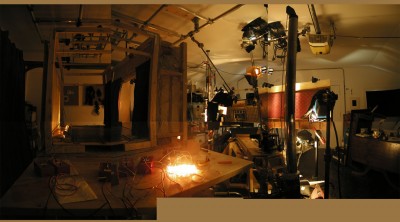
As promised, I’ve documented the setup for Scene 14, which is the one following the Amelie-like shot of Sabela looking out the window. Here we see her from the other side of that very same window. What started out as a simple 7-second shot somehow turned into a mammoth lighting and dolly setup that took about 2 weeks to design and build.
I’ve made a video and some panorama collages of the setup, in the attempt to explain what’s happening there lighting-wise. The info is second hand from Marcus, remembered and repeated with 90% accuracy, guaranteed 🙂
It’s 10 minutes long, but be sure to watch til the end, where I show a little timelapse of the lights turning on sequentially to light the scene, so you can see what each one is doing.
We used a total of 11 lights on the scene. Three Dedos, eight Arris — all 150 Watts.
The Breakdown (more or less in order of how they were added to the setup):
1. The Main Light: Dedo with barn doors, orange gel. This is the warm side light to illuminate Sabela and the window wall. The light bounces off a large white foam core card: the card is the light source here. (Bouncing lights off cards helps to soften them in such a small, delicate set.) The light is flagged by four pieces of foam core, which help crop the light into a vignette on the wall, and limit the light on Sabela’s legs, so that they fall off into darkness at their base. (We will have to bring back this vignette effect in post, as some of it was lost when lights #9 and 10 were added at the end… Those two bounce cards spilled a lot of light everywhere, which you can see happening in the timelapse at the end of the video above.)
2. Special Dedo. This light has a projection lens and iris unit, which allows us to have a precise spotlight on Sabela’s face. The light is filtered through a diffusion gel to soften its edges, as well as a pinkish-orange gel, as her face was looking a little sickly green without it. (Maybe because of the green hue to the glass?)
3. Blue Gel Arri from Below. This one shines up onto a piece of white foam core on the outside of the wall, opposite to the orange foam core of the main light. This bounces to create a soft blue moonlight on the outer wall, as well as a 3/4 backlight to Sabela’s face. It also helps fill the shadows created by the Main Light.
4. Back Blue Gel Arri. A light shining through a flicker rig, as well as diffusion paper-backed black wrap. The black wrap has been punctured with strategically-placed and -sized holes, creating a small starfield in the window.
5. Far-Away Dedo. This orange-gelled light has barn doors that are open about 1mm, just creating a soft-edge highlight on the red theatre curtain, which is reflected in the window.
6. Line of 4 LEDs. These are lined up at the back of the theatre set, out of sight. They are placed about 5 cm from the back wall of the theatre, and cast a gradated glow there. Since LEDs tend to be cooler than incandescents, we’ve added orange gels to them.
7&8. Pair of Arris with snoots. These are placed at a sharp angle above the extra theatre wall to create two scalloped beams scraping down the side of this wall.
9&10. Two foam core bounce cards (lit by another pair of Arris). These fill in the details of the wall that weren’t lit by the scallops: the wood below the chair rail of the wall, and the wallpaper detail to the right of the scalloped lights.
11. Hair Light Arri. This was brought in at the end of the lighting design process: the finishing touch. The back of Sabela’s head was getting lost in shadow; it seemed like she needed a highlight in her hair to add some dimension to her head. The light is flagged to avoid spillage onto the window frames.
The Star Field (& Apparatus):
To animate Sabela more easily, and — particularly — to add and remove her eyelids when she blinks, Marcus suggested using a piano hinge to rig up the window wall. This way the wall can lift up between shots, making Sabela more accessible. The hinged wall locks into place with rare earth magnets at the base, ensuring that it lands in the exact same place every time.
High fives to Marcus for his awesome lighting job on this one!!!
Now to tear it all down…
*Edit* — Here is the shot itself, pre-post FX.


Man, Stephanie, that set-up looks sensational. I can’t wait to study this post in-depth and try to emulate the professional techniques you have implemented in it.
You are a woman of your word and I thank you for taking the time to document this lighting set-up in such wonderful detail.
You’re welcome Shelley! Hope the information comes in handy…
Thank you, thank you, thank you!
Wow that is one of the best lighting tutorials I have ever seen. Masterfully done, the results are fantastic.
Some really subtle lighting going on – very nice.
I have a question for you about about the plastic sheet behind the star field. Does that give you a twinkle effect with the stars when you animate it?
Thanks for sharing your set up.
Hey Mark,
I’m glad you like the tutorials!
The plastic sheet is indeed meant to create a twinkle effect, though it ended up being pretty subtle in the final shot. It’s just a thin sheet of flexible plastic (vinyl? It was taken from the packaging of a Barbie toy; I like to save materials like that for these kinds of purposes.) Then I spraypainted it randomly with black spraypaint, trying to leave feathered-edged splotches of paint. That way when the plastic moves (it could have rotated as a disk, but it was easier to build the supporting rig so that it moved side-to-side) the light coming through the stars was obscured in a soft way (because of the feathered edging.)
If you scrub through the final shot of scene 14 — oops, I forgot to link it here, I’ll add it now — then you can see the twinkle effect more easily… I was only moving the plastic by 1mm per frame, at 24 fps, so I suppose I could have moved it faster for a more obvious effect.
Aw, the effect is very hard to see with the Youtube compression, even by scrubbing 🙁 But it’s there, really! I might try posting a better vsn later.
DANG!! That is a MONSTROUS set up….WOW!!
super pro….
are you shooting at home or in a studio?
Did you already have all this equipment?
very cool post!
jriggity
Thanks Justin!
I’m shooting at my home studio, which is in the garage. I don’t own any of the equipment — all grip stands and lights are rented.
OK, I finally got to see this in detail and…
un.be.leave.a.bull. That was the most intricate, creative, and sculptural lighting set up I’ve seen! Incredibly inspiring and informative. And far better produced than needed, but then, you can’t do anything halfway. Thank you 1,000 times for making this.
I think I had an artgasm watching this. It was the plastic Barbie packaging spray painted black to twinkle the stars that did it. The entire set and lighting set up are so well done I am awestruck by your abilities.
Those lights were so desirable. Do you find renting equipment like that bother your workflow with a time/money pressure or is that a good kick in the pants to get it done?
Great seeing you in person and hearing how to pronounce Ari and dado, hee. Your animated scenes are stunning!
WOW, thanks Shelley, for letting me know! It was a bit of work putting all that info together so I’m really happy to hear that it’s useful 😀
I’m not 100% sure I’m pronouncing those names right, so don’t take my word for it 😉
I have zero ability in the lighting dept. so really you are in awe of Marcus, my DoP friend who kindly put it all together.
My biggest contribution to the setup was the Barbie plastic + rig — other than that, it’s all Marcus.
Because of his schedule (he’s a busy guy) we can’t work on this too regularly, so I am very fortunate to have gotten a great deal on the lighting rental from White’s (a local film equipment rental co.) Otherwise I would be really screwed — it’s just impossible to rush, because of Marcus’ availability. Worth the wait tho IMO. 🙂
This is great! Thanks for lighting tutorial.
Thanks Yuji, and you’re welcome! 🙂
It was really generous of you to put this tutorial together. Thank you so much! How clear an idea did you have of what you wanted before you started lighting and how much did you and Marcus develop it as you went along? It’s a very beautiful 7 seconds.
I will forever pronounce those words your way. It’s Official. I follow you. I hope everyone interested in stop motion set lighting, any scale set lighting actually, gets a chance to see what you and Marcus created here. And how fantastic to have the equipment affordably for as long as you needed it. Best of both worlds, that.
Pingback: windowboxes » The Big Climb, and Some Underlighting
Pingback: The Big Climb, and Some Underlighting - stephanie dudley
Have you had enough of expensive PPC advertising? Now you can post your ad on 5000 advertising websites and you only have to pay a single monthly fee. Get unlimited traffic forever! To find out more check out our site here: http://postmoreads.net.n3t.store
Good afternoon, I was just visiting your website and filled out your “contact us” form. The feedback page on your site sends you these messages to your email account which is why you are reading through my message right now correct? This is the most important accomplishment with any kind of advertising, getting people to actually READ your ad and I did that just now with you! If you have an advertisement you would like to blast out to thousands of websites via their contact forms in the US or to any country worldwide send me a quick note now, I can even target specific niches and my charges are super reasonable. Send a message to: dalosrafael9183@gmail.com
Did you know notes like these that come through your website’s contact page are in fact a highly effective way to get more visitors and sales for your website? How exactly is this done? Simple, we craft an ad message like this one for you and we blast it out to millions contact forms on any site in any business niche or location you like. Does this work? Since you’ve ready my entire message then you’re proof that they do! The best part is, this doesn’t cost more than $3 a day! Want more info? drop us a line vie email here: ErnestLilliana57358@gmail.com