Two Hands, Two Font Finds

One day I want to make a robotic syle of puppet, just so I can use these hands as they are here.  I love how the wires look like tendons.

Next these’ll get dipped in liquid latex and painted.

Also, I don’t know how many of you stopmotioners get excited about fonts, but I do.  These guys fell into my inbox in the past week or so:

Compendium at Veer.com

Handmade, by Misprinted Type, at MyFonts

Aren’t they luscious?

Charts and Graphs, Odds and Ends

A couple of lovely friends, Parki and Kim, spent their Saturday morning helping me out with various  film-related things.  Their Saturday morning!  They arrived bright and early, fueled by lots of coffee, the crisp fall air,  and the desire to make miniature things.  Kim helped with a task I had originally thought of as tedious, but that’s now being called meticulous.  I think that sounds much better.

She helped me out by making all these tiny fingers for Sabela.   These are electrical wires casings, gutted of their fine wires and replaced with jewelry wire.  Tiny glass seed beads act as joints.

Parki wired up and spraypainted these spotlights.  They’ll have tiny functioning incandescent lightbulbs in them, and he’ll eventually attach them all to a dimmer so they can be animated.

The spotlights themselves are made of metal bottlecaps, wood, and some heavy card for the barn doors.

Here are Sabela’s backup legs, unpainted, with magnetic feet, standing on a pretty metal box.

And here are the tasks I’m facing right now.  I thought I’d put it together in a chart so I can keep track of the progress.  It seems a little daunting at the moment.

I’m using the same molds for the legs and head of Abigail, who’s Sabela’s little sister.  They should look a bit alike, anyway.  Liberdade is the Mom (she now has a name!), and Xosé Luís is the Dad.

I’m making backup parts for all the puppets.  Hopefully this will be enough; if not, I guess I can make more while shooting, though that’s obviously not ideal.

The main character is going to (of course) be featured the most, and is going to be moving around more than anyone else.  She’s the only character who will be walking, so I figured she’d need lots of extra backup legs for sure.  I think she’ll be in the film for about 1.5 minutes, at most…  The other characters will be on for about 45 seconds.  The 3 “side” characters are all sitting, and mostly moving their upper bodies.

I wonder if this is going to be enough backup parts?…

How to Cast a Head: Pre-Stage 1: The Eyes

OK, let’s backtrack a bit.  I realize I launched into the puppet casting without explaining the most important part:  the eyes.

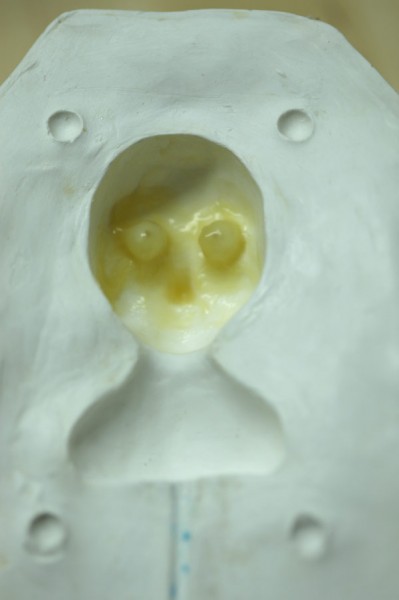
Here’s what the inside of the Sabela mold looks like.  When I made the mold, I put straightened-out bits of paperclips in her eyeball beads.  Paperclips work well because they’re the right size for these particular beads, and they’re made of really stiff wire.  They’re sticking straight out, like in Xosé Luís’ eyes in the previous post.

After the mold was done, the original plastecine sculpt removed, I carefully trimmed the paperclips down so that they’re just slightly shorter than the hole of the bead when it sits on it.  Just so there’s no wire overhang when the beads are put in place.  I.e. the beads I’m using for the eyes are 7mm in diametre.  So I trimmed the wires down so they’re sticking out about 6mm inside the head.

Then, when it’s time to cast the head, this is how I begin:

  1. Line the tiny edges of the eyes — the eyelids, top and bottom — with liquid latex, filling up all the crevices, but trying to leave the eyeball part clean.  This step allows you to paint the tiny folds clearly before the eyeballs go in, because once they’re in, it’s very hard to get into those areas.
  2. While the latex is still wet, insert a placeholder bead (these are exactly the same size beads used throughout, and for the final eyeballs) over each wire.
  3. Fill the holes of the beads with a tiny bit of plastecine, and level the plastecine off with the shape of the bead.  Basically this eliminates the hole so that latex doesn’t seep into the bead and lock it in place in its socket.
  4. Brush more liquid latex over the entire bead, creating an eye socket.  I like to brush latex all over the inner face at this point as well, just to make sure the details of the nose and mouth are firmly coated, and to build up those parts a bit thicker.

Let that all cure for a few hours.  When dry, repeat, building up 3 or 4 layers of latex.  In the end, it will look something like the picture above.

That’s it!  Once the eye sockets have cured, you’re ready to go on to Stage 1, lining the inner mold with liquid latex.

Zooming forward to beyond the end of stage 2, which would be stage 3, I suppose; after the cast is finished, foam filling and all, and the head is totally painted and ready to go — this is when the placeholder bead is carefully removed, and the painted eyeball is put in place.  Before I take the eyeball out though I carefully stretch it open a bit and dust a little talcum powder inside the eye socket, just to be sure the eyesocket doesn’t stick to itself on the inside and get pinched shut.  Once the placeholders are taken out, I put a bit more talcum powder inside the empty sockets, and brush it around… The powder helps the final eyeballs articulate more easily.  Pop the final eyeballs in…  Voilà!

Xosé Luís Begins… and Friends.

I’ve started to make the mold for the Dad — and he now has a name!  Xosé Luís.  Named after Xosé Luís Méndez Ferrín, a famous Galician writer, whom Erín suggested… I just like his name; hopefully I’m not doing the writer a huge injustice by borrowing his name for this little character.

But here he is, in progress, with half his mold curing:

So, basically he has shards of a paperclip coming out of his eyes, the poor fellow.  But this is only to hold his eyeballs in place when he is eventually cast.  Very helpful proxies and guides.

Also, I brought Sabela home today from my friend Alli’s.  She has finished her costume, which looks absolutely amazing.

ALSO, I had lunch today with my friend Loretta.  Loretta is an amazing hairdresser, and offered to cut and style the characters’ hair.  HOW GREAT IS THIS?  I feel so lucky today, and most days, to know such talented and kind people.  Just this week I have friends helping out on the lighting (Parki, who makes awesome art deco lights and other cool stuff in his spare time), is wiring up all the practical lighting of the set — footlights, spotlights, etc. for the theatre…  Alli is the talented purse designer & sewer who is making all these gorgeous costumes… and Loretta, the most talented stylist I know, cutting hair.  Woot!

How to Cast a Head: Stage 2

(You can read How to Cast a Head:  Stage 1 here.)

(This is part of the process of casting parts for Sabela, the main character of the film.)

I’ve heard a few pro puppet-makers poo-pooing Urethane foam.  Apparently latex foam is far superior in its texture, density, air bubbliness, etc.  But it seems like it takes months, or even years, to learn how to use it!  You have to keep detailed logs on the humidity, room temperature, and how they affect the mixing times and gel quantities.  You have to go through many, many trial and error batches.  And with each batch you have to juggle 4-component chemical mixtures, adding each one at specific times in specific measurements.  Plus 4 hours of baking time per batch!  Stop motion animation takes some extreme patience, but for some reason I just don’t have the patience to be a mad scientist mixing batch after batch of noxious chemicals.

So I decided to use the inferior foam.  Which, in my opinion, isn’t really that far inferior.  It has its problems, but I’ve found workarounds.  I’m very pleased with this technique.

The down side to urethane is that it can possibly sometimes shrivel a bit.  Not sure why.  Also, the bubbles are not fine enough to pick up all the details of the mold.  My solution to both problems is described in the stage 1 process:  line the mold with liquid latex.  The details remain, the casting doesn’t shrink, and everything works out great!

So, without further ado, here is how I cast the urethane foam head for Sabela.

I use Smooth-On Flex-Foam-it! III Urethane Foam.  It’s a 2-component foam that mixes in 30 seconds, pours as a gel, and foams in the mold in about 1 minute, to expand 15 times its original volume.  It cures in 30 minutes.  Easy!  There are various densities of this foam… III is the lightest, airiest one.

To make this head, I only used 1/2 oz. of Part A and 1 oz. of Part B, mixing it vigorously in a hummus container used only for this purpose.  (Clearly I eat a lot of hummus!)  I also have a plastic palette knife dedicated to the purpose of mixing these components, because this stuff is messy — it sticks to everything.

There is a very small window — after the 30 seconds of mixing — to get this stuff in the mold.  That window is about 20 seconds or so.  I like that the foam spends its first moments as a gel so it can be poured, rather than injected.  Note that the hole at the top of the mold has to be fairly wide — I had to carve this one wider, otherwise the gel would cure on its way down.  It’s a 1 cm deep by 4 cm wide rectangle, approximately, carved out below the shoulders.

It rises like a soufflé…  and smells somehow sweet, like mirangue.

30 minutes or so later, I peel away the foam from the outside.  It is impossible to totally remove it all from the plaster, so a couple coats of release agent is a good idea for the innards of the mold, just in case any creeps in.  (This happens in stage 1, of course.  Hopefully I mentioned that already.)  The latex lining should keep it from sticking to the inner mold, though, overall.

Carefully peel away the mold parts…

And here she is!  She looks a little mottled because the latex is thicker in some areas than others… which isn’t a big deal.  Once she’s painted and the seams and eyes are cleaned up, she’ll look great.

P.S.

Here she is (mostly) painted and cleaned up!

* An unrelated side note:  I’ve found out that this blog looks horrible on PCs.  The type is ginormous and the header is too big.  Sorry about that, for anyone who’s reading it on a PC… I’m not a whiz at CSS, and have no idea why it’s looking so crap.  I could put “site looks great on a 1680 x 1050 monitor using Mac OSX and Firefox” at the header because that’s what I’m using but I realize that’s not practical so I’ll have to figure out how to fix it, eventually…

Puppet #3

Still no names yet, but they’re coming.

Today I sculpted the Mom character — Sabela’s mom.  All pictures are clickable for enlarging.

I used the Medium grade plastecine, and some pretty basic wooden sculpting tools.

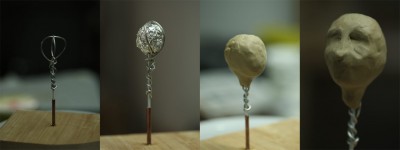
Drilled a hole into some scrap wood, just wide enough for this copper tubing.  Epoxied it in place.  Then used some coat hanger wire (for its stiffness) and armature wire (for its armatureness) to form a rough head.  Filled it with crumpled up aluminum foil, and roughly coated it with some plastecine.  Then roughed out the basic facial shapes:  eye sockets, cheekbones, chin, nose.  I don’t get too fussy at this point.

The eye sockets that were roughed in above were too close together — I want her to resemble Sabela somewhat, and Sabela has quite far-set eyes.  So I had to pull the eyeballs out a couple times until the placement was level and well-spaced.  Then rolled up tiny bits of plastecine and worked them around the eyeballs, creating lids for them.  (Please excuse the nail polish — I NEVER wear nail polish but just did that this past weekend for fun.  The colour is called Disco!)

The eye sockets needed to be deeper, so I carved away a bit of clay around the eyes.  Then tweaked away at all the shapes, adding definition here and there, and smoothing things out.  Also added tiny lips, and finally, her shoulders.

Here they are!  Sabela’s Mom and Dad.  I won’t make the plaster molds for these guys until they have names.  I’ve become a little superstitious about that.  Puppets are much more cooperative when they’re named; I think you really have to respect them as though they were living beings, and treat them carefully, as strange as it may sound!

Puppet #2

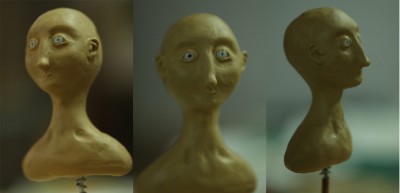
I’ve sculpted Puppet #2.  Don’t have a name for him yet.  (Click to enlargeth.)

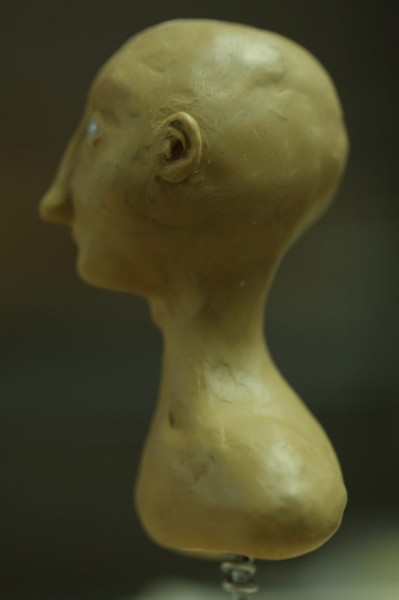
I’m really fond of that ear.  The other one isn’t as good.  They’re hard to duplicate exactly, and I did this one first.

I used Medium-density plastecine, simply because when I first started doing these puppet sculpts, I didn’t know the advantages of working with hard clay, and just figured I’d make things easier on myself by not having to knead rock-hard clay for 4 hours before being able to sculpt it.  I’m new to the moldmaking process, so I’ve since heard the theory (from Ron Cole in his excellent mold-making tutorial) that the rock hard stuff is the way to go.  So when I run out of this stuff, I’ll try his advice.  But for now I really like the looseness and ease of modelling with the Medium.

Anyhoo…  I thought I’d mention my thought process behind creating these characters.  I don’t sketch my characters before sculpting them, which may be a mistake, but I just find I think better in 3 dimensions.  I start out with an idea for the character, i.e. all my characters will have these tiny pouty lips and some kind of exaggerated aspect to their features.  For this guy, it’s his nose.  I like the elongation and the knobbiness of it.  I wanted him to look friendly, so angled his eyes down a bit at their outer corners.  I wanted him to look a little awkward, so stuck his ears out a little.  Basically I work away at the shapes until they just feel right.

I’m not too influenced (consciously anyway) by stop motion characters that already exist.  For the characters I’ve sculpted so far, Sabela and #2, I’ve looked to illustration and sculpture.  Specifically, I like the illustrations of James Jean, Jonathan Viner, Sam Weber, and the sculptures of Scott Radke.  I think you can see a little of Jonathan Viner’s male characters in #2 here.  Perhaps.

Next, I need to make his plaster mold.  I’m juggling 5 different things at the moment.  One of which is letting the latex skin dry on a backup Sabela head — I should be posting the next stage of that casting, the urethane foam stage, in the next couple of days.  Then the legs, hands, and hair.

Whew!

Rush Revisited, and Eyeballs

I was a MASSIVE Rush fan in high school, and many of their songs instantly take me back to that Neil Peart-idolizing, Ayn Rand-discussing fog of youth.  This song is particularly special, not only because I grew up in YYZ, but because that infamous Morse Code Airport Intro always seemed like such a cool idea.  No?

Anyway, here it is played on a Yamaha organ by an 11-year old girl.  This has nothing to do with stop motion, but there’s a little girl character in my film, and…  OK it has nothing to do with anything.  I just like it:

and, some eyeballs…

(Click to enlarge.)

Here’re the eyeballs I’ll be using for all 4 puppets.  These are little glass beads that are about 7mm in diameter.  They’re a little uneven in consistency — some areas are more transluscent than others.  I picked out beads that were more solid white to use for the eyes, but some subtle mottling makes them a little more interesting.

I filled the holes in with Milliput, which is an epoxy putty from the UK, and a little hard to find here.  (I eventually happened upon some at an awesome little hobby store here in Toronto, called Wheels and Wings.)  I could have used plumber’s epoxy for this, but Milliput works better for the finer-detailed things because it takes longer to dry and is easier to sculpt.  I fill the hole almost completely, leaving a tiny indent where the pupil is, so that I’ll be able to move the eyeballs around in their sockets later.

Then I paint the beads with acrylics, looking through a magnifying glass so I can see what I’m doing — these eyes are tiny!  The final touches (not yet done in this photo) are to tidy up the edge of the irises with a fine-pointed wooden sculpting tool, and then to put a clear coat of polyurethane over the top hemispheres, to seal the paint and add some overall gloss.

How to Cast a Head: Stage 1

I cast my puppet parts in several stages.  The first stage is to create a latex shell, which makes a kind of skin for the puppet.  I like liquid latex because it’s great at maintaining all the details in the mold, and it doesn’t shrink.  For the head it’s essential because it will eventually hold the hair in place — I actually jab hair in by the strand, and the latex is sticky enough to make each strand stay put.

The down side of latex is it doesn’t hold its shape at all.  I’ve tried stuffing the latex skins with cotton batting, wire armature mesh, and other materials… even lining the inside of the latex skin with layers of stretchy latex-soaked gauze as it’s drying.  But as soon as I go through the “hair-jabbing” process, the head loses its shape.  Soooo… after much experimentation, I found a compound urethane modeling foam that fills it just perfectly.  (I’ll do tutorials on the foam filling and hair jabbing stages later.)

(One side note about the plaster mold:  I brush it with a couple coats of mold release before I do anything with it, just in case any of the foam eventually leaks out, even though it’s generally not necessary with latex.  Latex doesn’t stick to plaster, while urethane sticks to everything.)

First, I use a crummy paintbrush to fill in the eyelids and the details around the eyes.  The eyeballs are going to be glass beads, articulable in a latex socket.  So this stage allows me to get into the part around the eyeball, before I put the eyeball in place in the mold.  (The mold itself has wires that hold the glass beads in position… more on this in my later moldmaking tutorials.)

Once the latex eyelids are painted in, while the latex is still wet, I stick the placeholder eyeballs (just plain unpainted glass beads, that are the same as the ones I’ll eventually use for the final puppet) in position on the wires.  Then I fill the holes of the beads with plasticine.  This just ensures that the latex doesn’t go into the holes… since I want the eyeballs to eventually move around in their sockets, I don’t want latex to lock them in place, which is what would happen if latex seeped into the beads.
head innards

The next step is to paint the inner eye sockets with latex.  This is what’s pictured above — I’ve done 3 fairly thick coats of latex, letting it dry in between coats.  I also brush a coat or two of latex in the nose, mouth, and around the face… just to make sure it all gets coated well.

Then I make a simple armature for the head.  This is one straight loop of 1/16th inch aluminum armature wire, twisted together at the ends.  I like to wrap a bit of plumber’s epoxy putty around the loop part, keeping the head more solid for when I eventually handle the finished puppet.  I’m especially concerned about the hair-jabbing process… this tends to change the shape of the head.  So with this putty, it’ll hold its proportions.

Here’s where the armature sits in the mold… there’s a groove in the plaster made just for its little tail, and it’s held in place by that blue fun-tack stuff, which happens to be the ultimate secret weapon for stop mo animators.  (I wish there was a friendlier term for the secret weapon…  maybe it should be called a secret cookie:  something that’s sweet, simple, and makes life easier.)

Next, the cast is assembled and wrapped in those wide elastic bands that hold stems of broccoli together, and a bright yellow strap I got at Active Surplus.

That’s not really hummus.  Here’s where I pour some water into some liquid latex, making enough of the mixture to fill the head.  I add JUST enough water to make it more easily pourable… the liquid latex, when taken straight out of the jar, is quite thick.  I don’t have a specific formula for this; basically I add about a teaspoon of water at a time until the mixture seems runny enough to drip into the mold.  Too much water and the latex skin won’t be very strong — like most things, it’s a fine balance.

Mix thoroughly.  A good way to describe the consistency is that it should look like pancake batter.  If it’s overmixed and gets too many air bubbles, just let it sit for a while (with the lid on the container) so the bubbles have time to dissipate.  Otherwise the bubbles will be embedded in the skin.

Then I fill the mold to the top and let it sit for 15 minutes or so.  By filling it to the top, I’ll know that every part of the mold is covered.  You could put a little in and swish it around, but this technique seems to work better.  I don’t remember why it should sit for 15 minutes — I think I read that somewhere.  Anyway, it doesn’t hurt.

Then I pour the excess latex back into the hummus container from where it came.  This mixture is definitely reusable.  Don’t pour it back into the original jar of latex though — keep a separate container for the pre-mixed watered-down stuff.

Then the head gets to sit for a couple of days to dry.  To speed this up a little, I sometimes use this hair dryer contraption I made… it’s basically a hair dryer taped to a cardboard tube taped to a strip of that rubber (or is it plastic?) tubing that is used to coat electrical wires (one of those Active Surplus things.)  The dryer is set on its lowest, coolest setting… just to get some airflow into the mold, without burning down the studio.

A word of caution, echoed from some highly disappointing moments:  BE PATIENT.  Do NOT open the mold too early.  Actually, don’t open the mold at all, until the next stage (foam filling) is complete.  If you go on to the next stage before the latex is totally dry, the head will get mangled by the pressure of the urethane as it foams up.  If you open the head to check whether it’s dry or not, you won’t be able to get the mold back together with the skin in tact, because it’s impossible to reset the eyes back in place on the wires.  So your head will be ruined.

It sucks to have to go back to the beginning and start all over again — let the latex skin sit for 3 or 4 days if you want to be sure it’s totally dry.  2 days should be OK if you’re using the hairdryer trick.  To be precise, I found it safe to go on to the next stage after 2 days and 6 hours, with the hairdryer on for a few hours a day.  The electricity bill was pretty high doing this…  I do feel bad about using so much electricity, though there was some AC usage in the studio too to compound it.  I would feel worse if we weren’t using Bullfrog… but that’s another story.

The next stage:  filling the head with urethane foam…

Puppet Parts

Here’s a peek at the finished puppet!  I’m so excited this one’s almost done.  It’s been a couple months of trial and error to get to this stage:

I made my puppet in separate parts:  the head and legs are cast from 2 plaster molds, while the torso, arms and hands are built up individually.  I went pretty low-tech with the torso, building it out of armature wire, plumber’s epoxy, polyester batting, and nylon stockings.  Her clothes will eventually cover this up, anyway.  For the rest, I figured casting from molds would make the replacement process easier in case things break… and oh, sadly, they will.  The head (neck) armature won’t break as often as the legs, since the character will be walking around quite a bit… and the head takes much longer to make, so it made sense to cast them separately.

The hands will probably break too at some point.  Originally I had made tiny molds for them, but the molds were difficult to fill, and the final casts ended up looking cartoony for some reason.  Also the fingers were way too tiny to be practical.  So I ditched that idea.  I’ll eventually do a tutorial on how I made these hands… I think they turned out pretty well, considering how small they are!  Aesthetically I would have liked them to be smaller, but my sense of the practical won over.

For stability, she has magnets in her feet, as well as a bolt in her upper back.  Hopefully I won’t have to use the bolt too often (it’s removable), and the magnets will do the trick… otherwise I’ll have to deal with lots of rig removal at the end.

There’s so much to describe with all these processes, and I’d like to remember all the details, so I’ll be documenting the stages here over the next few weeks.  I’m building the back-up parts for this puppet this week, as well as starting on the 3 other characters.

This character’s named Sabela, which, according to a Google search, is the Galician version of Isabella.  A pretty name, and the one of the few names in Galician that I could pronounce and remember.

Incidentally, the puppet began coming together smoothly only after I named her… hmmmm…